I knew what I wanted the light box software to do
- run multiple static and animated lighting displays
- poll the hardware switch for manual control
- serve a web page for remote control
It quickly became apparent that I’d need multiple threads, using both cores of the Pico to achieve my design brief.
I was concerned that I’d have to go back and learn to use C for this project, because I’d read that the threading using micropython wasn’t very well developed.
Undeterred, I poked around on the internet looking for the answers I needed.
I built the web interface using the getting started example project on raspberrypi.org. That dealt with the backend and provided a proof of concept, yielding a very ugly little web page that allowed me to switch LEDs on and off. Cool.
Then I chanced upon the threading tutorial on core-electronics.com.au. That showed me that programming a multi threaded application was possible in python. It also provided an example of a prettier web page that used CSS. I mucked about with the example web page and referred to w3schools.com for some additional CSS style tags until I had a pleasant little web page.
Now came the part where I had to bring it all together.
The program is split into 2 parts – the web server and the LED controller. The LED controller also polls the hardware switch.
I set it up so that the hardware switch can be used to turn the light box on or off by holding it down for about 2 seconds. Pressing it momentarily cycles through the available display modes. The switch can also be used on power up to cancel WiFi connection, in case there is no WiFi.
The 4 solid colour modes are simple enough. The LEDs are set to white, red, green or blue. There are 2 animated modes, cycle and random. In the cycle mode, well, you’ve seen RGB colour rainbows before. I did have to think about the algorithm a bit, because you need to add a half wavelength of time where the output curve of each colour remains at zero. It means that as each colour reaches its maximum duty, the other two colours are at zero. This gives a moment of pure red, green or blue and then the colours begin mixing again.
In the random mode I wanted each strip of LEDs to display a different randomly selected colour. I found that randomly selecting RGB values meant that there were a lot of dim combinations. I elected to create a list of 6 of the most saturated colours and randomly select from that.
But the effect wasn’t very pleasing, because the colours flickered from one to another. I solved this problem by selecting a new random colour at the beginning of each cycle and then calculating a delta from the current colour (collection of PWM duties). Adding the deltas to the current PWM duty over 4096 counts allows the old colour to transition smoothly to the new one. At the end of the 4096 counts the program selects a new random colour. The finished effect is quite attractive.
The web server thread, running on core 0 does very little beyond serving the web page.
While waiting for a WiFi connection, the light box glows red. Once it finds a connection it flashes green and then shuts off. At this point the web page is up and the hardware button can be used for manual control.
As it responds to queries, the web server thread sets a powerOn flag to True or False and sets a displayMode variable when a user selects one of the display mode buttons.
No one will be surprised to hear that I had to make judicious use of global variables and locks to communicate between the threads and prevent resource clashes.
I added a bit to the code so that the button corresponding to the selected display mode is displayed in yellow.
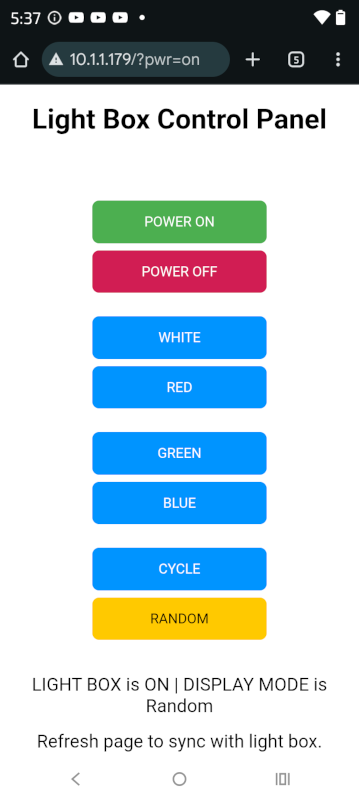
The above image shows a screen grab from my phone, showing the light box is on and in random colour mode.
One thing I would like to add is visual indicator of whether the light box is on or off. I’d need to modify the html and the styling of the power buttons.
Thoughts
I found the WiFi to be a little unpredictable at night, with the light box unresponsive – or rather the computers not able to access the web page. I wonder whether there is WiFi congestion from the surrounding houses that becomes noticeable at night.
Finding the IP address that the light box has connected to may be a bit tricky. If the router decides to give it a different IP address it’s not straightforward to track it down. Thonny disrupts the program running on the Pico when you connect it, so with the firmware loaded into the light box, I can’t use Thonny’s terminal.
I left the debugging print statements in the script I saved to the light box, so it’s easy enough to use PuTTY to read the startup blurb that prints the IP address. I guess I could also log into the router to see what devices are on the network. If I added a display, that could be used to find the IP address and open up a whole lot of other possibilities.
In conclusion, the project came out pretty well. There’s room for improvement, but the important thing is that I have put a Raspberry Pi Pico to good use and have a good bit of code for utilising both cores on the Pico while enabling WiFi connectivity, something I hope to try out in one of my robots.
Originally written August 13, 2025